 Skip to content
Have you ever watched light dance through colorful windows and thought, “I wish I could eat that beauty”? That’s exactly what inspired me to dive into making Stained Glass Cookies during the holidays last year. These stunning treats, with their translucent candy centers that mimic stained glass, turned my kitchen into a little art studio. I’ve always loved how Stained Glass Cookies bring a wow factor to cookie platters without much extra effort—perfect for impressing guests or just treating yourself.
In my experience, the magic of Stained Glass Cookies lies in that satisfying crunch of the buttery dough paired with the sweet, jewel-like bursts from the melted candies. They’re not just cookies; they’re edible masterpieces that spark joy every time. If you’re ready to create some holiday sparkle (or anytime sparkle, really), I’m thrilled to share this easy recipe that’s become a staple in my baking rotation. Let’s get those ovens preheating and make some Stained Glass Cookies that’ll have everyone talking!
Key Takeaways:
- Stained Glass Cookies are a visually stunning holiday treat that combines buttery dough with colorful candy centers for an irresistible look and taste.
- Prep time is just 20 minutes, with chilling and baking fitting into a quick afternoon session for busy bakers.
- The flavor profile blends classic sugar cookie sweetness with fruity candy pops, making them a crowd-pleasing delight.
- Chill your dough for at least 30 minutes to ensure the best shape and easiest handling when cutting.
- Store Stained Glass Cookies in an airtight container for up to a week—they stay fresh and vibrant!
Why You’ll Adore This Stained Glass Cookies
Eye-Catching Beauty: There’s something truly magical about Stained Glass Cookies that makes them stand out on any dessert table. The way the candy melts into those gorgeous, translucent patterns feels like holiday artistry you can bite into. I’ve seen kids and adults alike light up when they spot them—it’s pure delight.
Simple Yet Impressive: Don’t let the fancy look fool you; these Stained Glass Cookies come together with basic ingredients and straightforward steps. What I love most is how they elevate a simple bake into something special without overwhelming your schedule. It’s that perfect balance of ease and wow-factor that keeps me coming back.
Customizable Colors and Flavors: With Stained Glass Cookies, you can play artist by choosing your favorite hard candies for the centers. Whether you go for vibrant reds and greens for Christmas or pastels for spring, the options are endless and fun. They add a personal touch that’s both delicious and decorative.
Family-Friendly Fun: Baking Stained Glass Cookies is a wonderful activity to share with little ones—they’ll love crushing the candies and watching the colors appear in the oven. It’s not just about the end result; it’s the memories you create along the way. Honestly, these cookies have brought so much laughter into my home.
Essential Ingredients for Stained Glass Cookies
Unsalted Butter: This is the heart of your cookie dough, providing that rich, tender crumb we all crave. I always use softened butter at room temperature to ensure even creaming with the sugar— it makes mixing a breeze. Without it, your Stained Glass Cookies wouldn’t have that melt-in-your-mouth quality that keeps everyone reaching for seconds. Cream it well, and you’ll notice the difference in texture.
All-Purpose Flour: The backbone of the dough, flour gives structure while keeping things light and crisp. Sifted flour prevents lumps and helps the Stained Glass Cookies hold their shape during baking. In my experience, measuring by spooning into the cup rather than scooping avoids dense results. It’s simple, but it elevates your homemade treats every time.
Hard Candies: These are the stars that create the stained glass effect in your Stained Glass Cookies, melting into beautiful, colorful windows. Choose fruit-flavored varieties like Life Savers for the best vibrant hues and subtle sweetness. Crush them finely to avoid large chunks that could affect even melting—I’ve learned this the hard way after a few uneven batches. They add that pop of flavor and visual appeal that’s utterly addictive.
How to Make Stained Glass Cookies
Prepare the Dough
Start by creaming together the softened butter and sugar in a large bowl until it’s light and fluffy—this usually takes about 3-4 minutes with an electric mixer. Beat in the egg and vanilla extract until fully incorporated, creating a smooth base for your Stained Glass Cookies. In a separate bowl, whisk together the flour, baking powder, and salt, then gradually add the dry ingredients to the wet ones, mixing just until a dough forms. Wrap it in plastic and chill for at least 30 minutes; this step is crucial for easy rolling and prevents the Stained Glass Cookies from spreading too much in the oven.
Cut and Fill the Shapes
Preheat your oven to 350°F and line baking sheets with parchment paper for foolproof release. On a lightly floured surface, roll out the chilled dough to about 1/4-inch thickness—keep it even for uniform baking. Use cookie cutters to create your shapes, then place them on the sheets and cut out smaller shapes in the centers with mini cutters. Fill those centers with 1/2 teaspoon of crushed hard candies, ensuring they’re level; as they bake, you’ll see the colors swirl and set, turning your Stained Glass Cookies into edible art. The aroma of vanilla wafting through the kitchen is heavenly, and it takes about 8-10 minutes for the edges to turn golden.
Bake and Cool
Bake the cookies for 8-10 minutes, watching closely so the candy centers bubble without burning— they should look glossy and set when done. Let the Stained Glass Cookies cool on the baking sheet for 5 minutes before transferring to a wire rack; this prevents cracking as the candy hardens. The cooling process is almost as exciting as the baking, with those vibrant colors solidifying into stunning designs. Once fully cooled, your Stained Glass Cookies are ready to dazzle—store them carefully to preserve that glass-like shine.
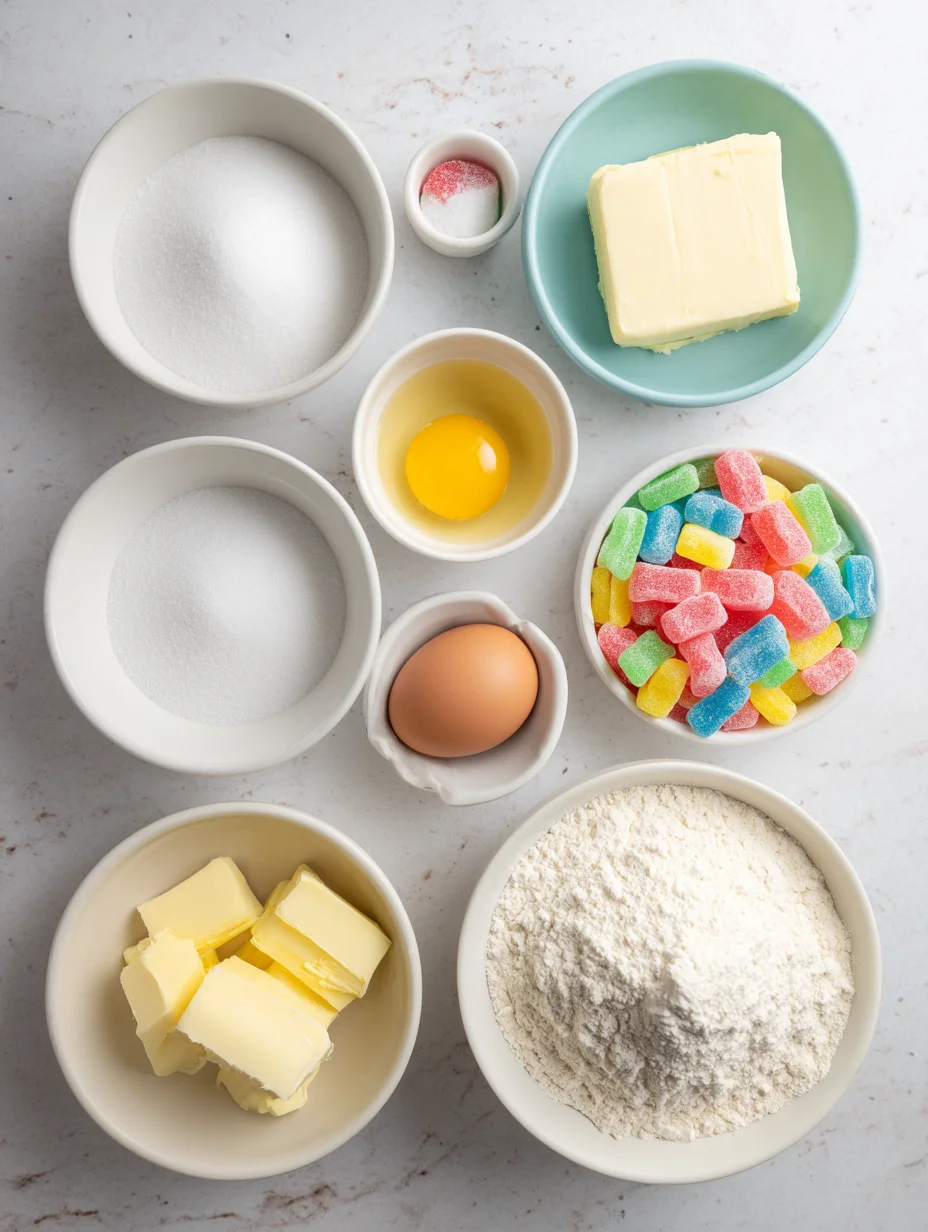
Ingredients
- 1 cup unsalted butter, softened
- 1 cup granulated sugar
- 1 large egg
- 1 teaspoon vanilla extract
- 2 1/2 cups all-purpose flour
- 1 teaspoon baking powder
- 1/2 teaspoon salt
- 20-24 hard candies, crushed (assorted colors)
Stained Glass Cookies Instructions
- Cream butter and sugar until light and fluffy, about 3 minutes.
- Beat in egg and vanilla until combined.
- Mix in dry ingredients to form dough; chill for 30 minutes.
- Roll dough to 1/4-inch thick; cut shapes and inner cutouts.
- Fill centers with crushed candies; bake at 350°F for 8-10 minutes.
- Cool on sheet for 5 minutes, then transfer to rack.

Pro Tips for the Best Stained Glass Cookies
Chill Thoroughly: Always chill your dough to prevent spreading—I’ve found 45 minutes works wonders for crisp edges.
Crush Candies Finely: Use a food processor for even pieces; larger bits can cause uneven melting in your cookies.
Don’t Overbake: Pull them out when edges are just golden—the centers will set as they cool for perfect Stained Glass Cookies.
You Must Know
- Stained Glass Cookies require no food coloring; the candy provides all the vibrant hues naturally.
- These cookies are naturally gluten-free adaptable with a 1:1 flour swap.
- The candy centers harden quickly, so handle gently right after baking.
- Yield about 24 cookies depending on cutter size—double the batch for gifting.
How to Store Stained Glass Cookies
To keep your Stained Glass Cookies fresh, store them in an airtight container at room temperature for up to one week—they maintain their crunch and color beautifully. For longer storage, freeze them in a single layer for up to three months; just thaw at room temp to avoid condensation on the candy centers. If you notice any softening, a quick 5-minute warm-up in a low oven revives that just-baked texture without compromising the stained glass effect.
Customizing Your Stained Glass Cookies
Feel free to swap the vanilla for almond extract in your Stained Glass Cookies for a nutty twist that pairs wonderfully with fruit candies. If you’re avoiding eggs, a flax egg works seamlessly without altering the dough’s tenderness. For a chocolate version, add cocoa powder to the flour mix and use dark chocolate candies—it’s a decadent variation that never fails to impress. Experiment with seasonal candies to keep your Stained Glass Cookies festive year-round.
What to Serve with Stained Glass Cookies
Pair these beauties with a hot cup of spiced chai tea to enhance the fruity candy notes and warm up the buttery dough. For a dessert spread, arrange them alongside fresh fruit like berries or citrus slices for a colorful, light contrast. If you’re hosting, serve with vanilla ice cream for an indulgent scoop-and-bite experience that melts together perfectly. A simple green salad or cheese board can balance the sweetness if making them part of a larger gathering.

Stained Glass Cookies Recipe
These stained glass cookies are so pretty and they're REALLY EASY to make. Impress your guests with these beautiful AND tasty sugar cookies!
Timing
Recipe Details
Ingredients
- 01 1 cup Sugar
- 02 1/2 teaspoon Salt
- 03 1 Tablespoon Vanilla extract
- 04 1 Egg (large)
- 05 3/4 cup Butter (room temperature)
- 06 2-1/2 cups Flour (all purpose)
- 07 16 Jolly ranchers
Instructions
Gather your cookie ingredients and supplies.
Add the sugar, salt, vanilla, egg, and room temperature butter to a mixing bowl.
Combine the ingredients in a stand mixer or with a hand mixer.
Add the all purpose flour and mix until the dough starts to clump together.
Transfer the dough to your working surface and knead briefly.
Cover your dough with plastic wrap and chill in the refrigerator for 1 hour.
Unwrap two jolly ranchers and place them in a plastic baggie.
Use a hammer or meat mallet to crush the jolly ranchers into very small pieces. Powder is okay as well, but try and get rid of any large chunks. Repeat with other jolly rancher colours. Two jolly ranchers will fill 3 - 4 cookies, depending on your cut out size.
Add flour to your working surface. Place the dough on top and add a bit more flour on top of the dough.
Roll out the dough until it's just over 1/4 inch thick.
Use a cookie cutter to cut out star shapes, or whatever shape you'd like!
Place the cookies on a parchment lined baking tray. You can also use a silicone mat, but you need to cover your baking sheet with something to stop the candy from sticking.
Cut out the centers of the cookies with a smaller cookie cutter of a similar shape.
Fill the center of the cookies with the crushed candies. Make sure they don't overflow; just add enough to cover the hole. Try and remove any pieces that fall on the top of the cookies prior to baking.
Preheat your oven to 350F and bake the cookies for 12 minutes. Allow the cookies to cool on the tray for 20 - 30 minutes, until the candy center has hardened.
Your stained glass cookies are complete!
FILED UNDER:
NUTRITION FACTS (PER SERVING)
Nutrition information is calculated using an ingredient database and should be considered an estimate. In cases where multiple ingredient alternatives are given, the first listed is calculated for nutrition. Garnishes and optional ingredients are not included.
Frequently Asked Questions About Stained Glass Cookies
Can I make Stained Glass Cookies ahead of time?
Absolutely, you can prepare the dough up to two days in advance and keep it chilled— it actually improves the flavor. Bake the Stained Glass Cookies fresh for the best texture, or freeze the unbaked cutouts for up to a month. Just add a few extra minutes to the baking time if baking from frozen.
How long does Stained Glass Cookies last in the fridge?
Stained Glass Cookies stay delicious in the fridge for about 10 days when stored in an airtight container. The candy centers hold their shape well in the cold, but bring them to room temperature before serving for optimal crunch. Avoid stacking to prevent sticking.
Are Stained Glass Cookies gluten-free?
They can be with a gluten-free 1:1 flour blend—I’ve tested it successfully for friends with sensitivities. The dough behaves similarly, so no adjustments needed. For extra assurance, check that your candies are gluten-free too.
What if my candy centers don’t melt evenly?
This can happen with larger candy pieces, so always crush finely for your Stained Glass Cookies. If it occurs, bake a minute longer next time, but watch closely to avoid burning. Even if imperfect, they’ll still taste amazing and look charming.
Can kids help make Stained Glass Cookies?
Yes, they’re great for little helpers, especially crushing candies and filling shapes. Supervise the oven part for safety, and let them choose colors for fun. It’s a messy but memorable activity that builds excitement around baking.
How do I clean up after making Stained Glass Cookies?
The candy residue wipes off parchment easily, but for dough scraps, a quick scrape helps. If any candy sticks to pans, soak in warm water—your Stained Glass Cookies are worth the minimal cleanup. Pro tip: Line everything to save time.
What’s the best candy for Stained Glass Cookies?
Fruit-flavored hard candies like Jolly Ranchers melt beautifully and add great color variety. Avoid soft candies as they won’t set properly. Experiment with mixes for unique designs in your Stained Glass Cookies.
Can I use this recipe for other holidays?
Definitely—switch candies for pastels at Easter or oranges for Halloween. The base dough is versatile for any occasion. Check out our lemon blueberry cookies for more seasonal ideas.
Final Thoughts
From the first roll of dough to that final colorful reveal, making Stained Glass Cookies has brought so much creativity and cheer into my baking adventures. They’re more than just treats; they’re a way to share joy and artistry with loved ones. I encourage you to give this recipe a try—grab your cutters and candies, and let your imagination shine. Your Stained Glass Cookies will be the highlight of any gathering, I promise!