 Skip to content
There’s something undeniably comforting about biting into a perfectly creamy Classic Deviled Eggs at a family gathering or summer picnic. I remember my grandmother’s version—simple, tangy, and always the first to disappear from the table. These little bites have been a staple in American cuisine for generations, and honestly, who can resist that classic combination of smooth filling and a sprinkle of paprika? In this article, I’ll walk you through my go-to method for making homemade Classic Deviled Eggs that are easy, delicious, and sure to impress.
Whether you’re hosting a potluck or just craving a quick snack, preparing Classic Deviled Eggs doesn’t have to be intimidating. I’ve tweaked the traditional recipe over the years to get that ideal balance of flavors without any fuss. Let’s dive in—trust me, once you try these, they’ll become your new favorite appetizer.
Key Takeaways:
- Classic Deviled Eggs are a timeless appetizer that’s perfect for parties and holidays, offering a creamy, tangy bite everyone loves.
- This recipe takes just 30 minutes total, making it an ideal quick-prep option for busy cooks.
- The secret to standout flavor lies in the fresh mustard and vinegar mix that gives your Classic Deviled Eggs that signature zing.
- For best results, use room-temperature eggs to ensure even boiling and easy peeling every time.
- Store leftover Classic Deviled Eggs in the fridge for up to three days; they’re even better chilled before serving.
Why You’ll Adore This Classic Deviled Eggs
Effortless Elegance: These Classic Deviled Eggs bring a touch of sophistication to any spread without requiring hours in the kitchen. I love how they look so polished on a platter, yet they’re incredibly simple to whip up. It’s that kind of recipe that makes you feel like a pro, even on a weeknight.
Grab This Chef Knife Now - Almost Gone!

- Stays Razor-Sharp: Ice-hardened blade keeps its edge longer than ordinary knives
- Superior Grip Control: Unique finger hole design gives you perfect balance and safety
- Built to Last a Lifetime: Premium stainless steel blade with elegant beech wood handle
- ✓ Finally, a knife that stays sharp and feels comfortable in my hand
- ✓ Professional quality without the premium price tag
- ✓ Makes meal prep faster and more enjoyable
⏰ Only a few items left in stock - order soon
Versatile Crowd-Pleaser: From barbecues to brunch, your guests will rave about these. What I find interesting is how kids and adults alike can’t get enough—it’s a win-win every time. Plus, they’re naturally low-carb, fitting right into modern eating habits.
Rich, Customizable Flavor: The creamy filling in these Classic Deviled Eggs bursts with tangy notes that you can tweak to your taste. I’ve experimented with add-ins like bacon bits, and it always elevates the dish. You might be thinking it’s basic, but that’s what makes it endlessly appealing.
Budget-Friendly and Nutritious: Made with pantry staples, this recipe keeps things affordable while packing protein from the eggs. Let’s be honest, in my experience, it’s a healthier alternative to many processed snacks. You’ll feel good serving something so wholesome and tasty.
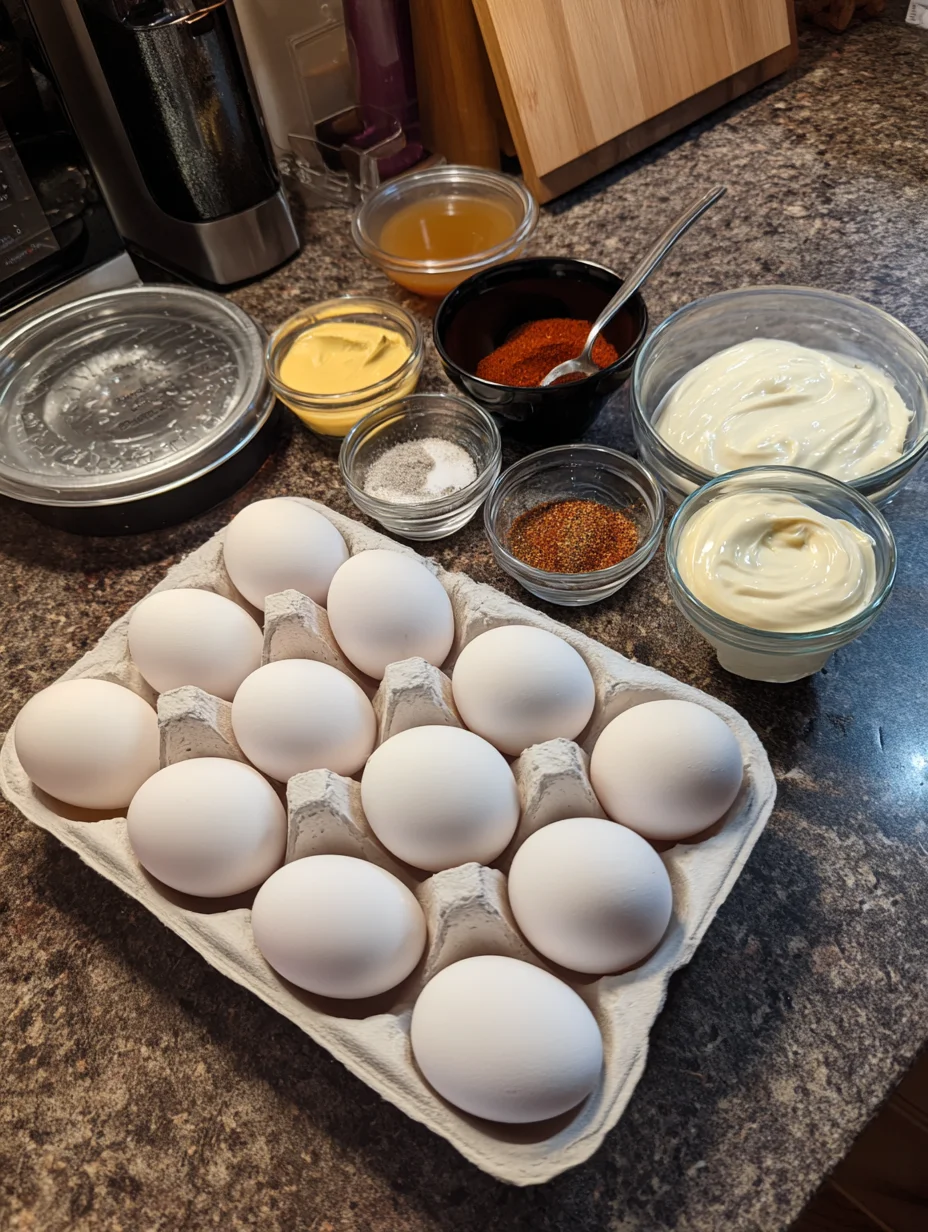
Essential Ingredients for Classic Deviled Eggs
Large Eggs: The star of your Classic Deviled Eggs, fresh large eggs provide the perfect base with their firm whites that hold the filling beautifully. I always opt for cage-free when possible for that extra freshness, which really shines in the final texture. Boiling them just right ensures they’re easy to peel, avoiding any frustration in the prep stage. Without quality eggs, your Classic Deviled Eggs simply won’t achieve that classic smoothness.
Grab This Kitchen Scale Now — Best Precision Pick!

- Razor-Accurate Every Time: Dual-increment precision down to 0.1g — perfect for baking, meal prep, and portion control with g, oz, ml, and fl'oz modes.
- Smart Removable Bowl Design: Detachable bowl doubles as a protective case for compact storage. Tare function lets you weigh ingredients in any container with zero fuss.
- Built for Everyday Convenience: Auto-zero, tare function, low battery alert, overload indicator, and 2-minute auto-off to extend battery life — all in a sleek stainless steel build.
- ✓ "Perfect for baking — precise, lightweight, and stores easily without wasting counter space"
- ✓ "A game changer! Weighing ingredients is now way more accurate than measuring cups"
- ✓ "Love the 0.1g precision and backlight — best food scale I've owned. Highly recommend!"
⏰ Only a few items left in stock - order soon
Mayonnaise: This creamy powerhouse binds the yolk mixture, giving your Classic Deviled Eggs that velvety consistency we all crave. Full-fat mayo works best in my book for richness, but light versions can sub in if you’re watching calories. It adds a subtle tang that complements the mustard perfectly. Don’t skimp here—it’s what makes the filling so addictive.
Yellow Mustard: A teaspoon or two of this brings the sharp, vinegary kick that defines traditional Classic Deviled Eggs. What I love is how it cuts through the richness without overpowering. Dijon can swap in for a gourmet twist, adding a bit more depth to the flavor profile. It’s this ingredient that transports you back to childhood potlucks.
How to Make Classic Deviled Eggs
Boil and Peel the Eggs
Start by placing a dozen large eggs in a saucepan and covering them with cold water by about an inch—this ensures even cooking for your Classic Deviled Eggs. Bring to a rolling boil over medium-high heat, then remove from the burner, cover, and let sit for 12 minutes. The key here is shocking them in an ice bath right after to make peeling a breeze; I’ve ruined batches by skipping this step, so trust me on it. Once cooled, gently tap and peel under running water for flawless whites every time.
Mix the Creamy Filling
Halve the peeled eggs lengthwise and pop the yolks into a bowl, mashing them smooth with a fork to avoid any lumps in your Classic Deviled Eggs. Stir in 1/2 cup mayonnaise, 2 teaspoons mustard, 1 teaspoon vinegar, and a pinch of salt and pepper until it’s creamy and well-combined—the aroma alone will have you excited. Taste and adjust seasonings; I like a dash more vinegar for that extra tang. This step is where the magic happens, blending flavors into something irresistible.
Fill and Garnish
Spoon or pipe the mixture back into the egg white halves, giving your Classic Deviled Eggs that plump, inviting look. A simple sprinkle of paprika on top adds color and a smoky note that ties everything together beautifully. For fun, I sometimes add chopped chives for freshness—it’s quick and elevates the presentation. Chill for 30 minutes before serving to let the flavors meld; you’ll notice how much better they taste cold.
Ingredients
- 12 large eggs
- ½ cup mayonnaise
- 2 teaspoons yellow mustard
- 1 teaspoon white vinegar
- Salt and black pepper, to taste
- Paprika, for garnish
- Optional: 1 tablespoon chopped chives or relish for extra flavor
Classic Deviled Eggs Instructions
- Place eggs in a saucepan and cover with cold water. Bring to a boil, then remove from heat, cover, and let stand for 12 minutes.
- Transfer eggs to an ice bath to cool, then peel under running water.
- Halve eggs lengthwise; remove yolks and mash in a bowl.
- Mix yolks with mayonnaise, mustard, vinegar, salt, and pepper until smooth.
- Spoon or pipe filling into egg whites. Sprinkle with paprika.
- Chill for at least 30 minutes before serving.
Prep Time: 15 minutes | Cook Time: 15 minutes | Total Time: 30 minutes | Servings: 24 halves
Pro Tips for the Best Classic Deviled Eggs
Perfect Peeling Hack: Add a splash of vinegar to the boiling water—it helps the shells slip right off without tearing the whites.
Flavor Balance: Taste the filling before stuffing; adjust mustard or mayo to suit your preference for tanginess or creaminess.
Piping for Polish: Use a zip-top bag with the corner snipped for easy, mess-free filling that makes your Classic Deviled Eggs look store-bought fancy.
You Must Know
- Eggs should be at least a week old for easier peeling, contrary to what you might think about fresh ones.
- Overmixing the yolks can make the filling too dense; aim for just smooth, not whipped.
- Classic Deviled Eggs are best enjoyed fresh but hold up well for make-ahead appetizers.
- Avoid mayo with added sugars if you’re keeping it truly traditional and low-carb.
How to Store Classic Deviled Eggs
To keep your Classic Deviled Eggs fresh, arrange them in a single layer in an airtight container lined with a paper towel to absorb moisture, and refrigerate for up to three days. If they’re topped with delicate garnishes, cover loosely to prevent smudging. Reheating isn’t necessary—they’re served cold—but if needed, let them sit out for 10 minutes to reach room temp for optimal flavor. Always discard if the yolks look discolored or smell off.
Customizing Your Classic Deviled Eggs
For a spicy twist on Classic Deviled Eggs, mix in sriracha or diced jalapeños to the filling—it’s a hit at my gatherings. If you’re vegetarian, skip any bacon add-ins and go for avocado for creaminess instead of mayo. Gluten-free folks will love this naturally fitting recipe, and for low-fat versions, Greek yogurt subs mayo seamlessly. Experiment with smoked paprika for a deeper flavor; your Classic Deviled Eggs will be uniquely yours, as seen in variations like our chips and dip platter for party inspo.
What to Serve with Classic Deviled Eggs
Pair these with crisp veggie platters like carrots and celery for a fresh contrast, or alongside a light garden salad to balance their richness. For heartier spreads, try them next to baked ham and cheese sliders at brunches. Beverages like iced tea or sparkling lemonade cut through the creaminess perfectly. Don’t forget fruit like watermelon slices for a summer vibe—it’s a simple way to round out the plate.

Classic Deviled Eggs
This easy and classic deviled eggs recipe is a timeless appetizer or side dish with the perfect blend of creamy mayonnaise, mustard and the yolks of hard-boiled eggs with a sprinkle of paprika for color.
Timing
Recipe Details
Ingredients
- 01 12 large eggs
- 02 1/4 cup mayonnaise
- 03 1 tablespoon mustard
- 04 1/2 teaspoon black pepper
- 05 salt (Pinch of)
- 06 Paprika (optional garnish)
Instructions
In a medium pot, place the eggs with just enough water to cover them.
Bring to a boil over medium-high heat and boil for 3 minutes. Then cover and remove from heat and let sit for 15 minutes, covered.
Remove the eggs from pan and place in an ice water bath for at least 5 minutes. Then remove the shell from each egg and set aside on a paper towel.
Slice the eggs the long way and scoop the yolk out and place in medium sized bowl.
Mash the cooked egg yolks slightly with a fork until crumbly.
Add mayo, mustard, salt and pepper and stir until smooth.
Spoon the mixture into the egg halves and top with paprika.
FILED UNDER:
NUTRITION FACTS (PER SERVING)
Nutrition information is calculated using an ingredient database and should be considered an estimate. In cases where multiple ingredient alternatives are given, the first listed is calculated for nutrition. Garnishes and optional ingredients are not included.
Frequently Asked Questions About Classic Deviled Eggs
Can I make Classic Deviled Eggs ahead of time?
Absolutely, you can prepare Classic Deviled Eggs up to 24 hours in advance— just store them covered in the fridge. The flavors even intensify overnight, making them taste better. Pipe the filling right before serving to keep the whites firm.
How long does Classic Deviled Eggs last in the fridge?
Your Classic Deviled Eggs will stay fresh for three to four days when kept in an airtight container. Beyond that, the texture might soften, so it’s best to enjoy them soon. Always check for any off smells before eating.
Are Classic Deviled Eggs keto-friendly?
Yes, they’re naturally low-carb and high in protein, fitting perfectly into a keto diet. The mayo and eggs keep carbs minimal, around 1g per serving. Add bacon for extra fat if you’re strict on macros.
What’s the best way to pipe Classic Deviled Eggs?
For smooth results with Classic Deviled Eggs, use a piping bag or a plastic bag with the tip cut off— it gives that professional swirl. Fill it generously but avoid overstuffing to prevent spills. Practice on a plate first if you’re new to it; it’ll make your batch look stunning.
Can I bake Classic Deviled Eggs instead of boiling?
Baking works as an alternative: place eggs in a muffin tin at 325°F for 25 minutes, then ice bath. It can yield even easier peeling. However, boiling is quicker for most home cooks.
How do I fix dry filling in Classic Deviled Eggs?
If the mixture for your Classic Deviled Eggs seems too dry, a teaspoon more mayo or a splash of pickle juice does the trick. Blend until creamy—overdoing it risks separation, so add gradually. This keeps the classic texture intact.
Are there vegan options for Classic Deviled Eggs?
For a plant-based take, use silken tofu instead of eggs and a vegan mayo. It mimics the creaminess surprisingly well. Season boldly to capture that tangy essence we love in the original.
Why do my Classic Deviled Eggs stick when peeling?
Sticking often comes from super-fresh eggs or skipping the ice bath—try older eggs and always cool them fully. A quick vinegar boil helps too. Patience pays off for perfect whites, as in our egg bites recipe tips.
Final Thoughts
Wrapping up, this Classic Deviled Eggs recipe is all about simplicity and joy—bringing back those nostalgic flavors with a modern ease that fits any occasion. I’ve shared it with friends who now request it everywhere, and I bet you’ll see the same. Give it a whirl this weekend; you won’t regret adding these gems to your repertoire—tag us if you do!